How To Fit Toilet Cubicles
Whether it’s the sophisticated exuberance of wood grain effect panelling, or a bold splash of colour to blend with company colours, toilet cubicles can bring a whole new design dynamic to the commercial washroom. While they may be the backbone of the wash space, knowing how to fit toilet cubicles is a process that needs to be carried out in a certain order.
From replacing your existing toilet cubicles, to installing them as part of a new build or refurbishment project, the following steps give you a guide to achieving that professional finish.
Sizing: Does one size fit all?
Before we explain how to fit toilet cubicles, we first need to assess the dimensions. Does one size fit all? The short answer to this one is no. While a rough guide for internal dimensions sits at around 900mm wide, by 1500mm deep, fitting toilet cubicles allow for a little leeway, particularly with bespoke options. Read our Blog: What are the standard toilet cubicle sizes?
The important thing is to ensure you have enough space to manoeuvre between the edge of the toilet pan, and the edge of the door when opened. It’s important to note that most toilet cubicles open inwards, unless it’s a disabled or ambulant disabled toilet cubicle - for both these cases internal dimensions differ anyway.
Quite often, a business will be working with some unique or unusual internal dimensions, in which case we can offer some custom options that allow for the right internal space while conforming to your buildings structural nuances.
Before you order
When shopping for toilet cubicles, be sure to contact the supplier to explain what it is you’re looking for. While there are some versatile options available, you want to make sure you get cubicles that will work effectively. Your washroom dimensions and number of desired toilets will dictate just how many toilet cubicles you will need. Take the time to relay your dimensions and time constraints to make sure you get the right cubicles for your washroom. This will not only make sure you get the right finish, but also the best longevity. Read our Blog: Toilet Cubicles: What is the Right Material for me?
Bespoke cubicles are made to order and have a 3-4 week lead time from approval of drawings. These cubicles come in a flat pack form and require assembly by a competent tradesperson.
However, we also offer our Ultra Fast Range, a solid grade laminate cubicle that comes oversized. This requires cuts and more time fitting, but can be on-site and fitted in a matter of days.
How to fit toilet cubicles
STEP ONE: Unpacking and laying out your cubicles
When you’re ready to install your washroom cubicles, the first thing to do is clear the space and lay-out your panels and fixings. You may choose to lay sheets down to protect the cubicle surfaces or make sure there is no debris on the floor which may damage them. Try to avoid leaning doors or partitions up against the wall for long periods of time as you may find the material is prone to bending and may make the installing process more difficult.
STEP TWO: Marking out and making your wall fixings
Working to your drawing, set out the width and depth of your cubicles locating and fitting your U-brackets or U-channels firmly to the wall.
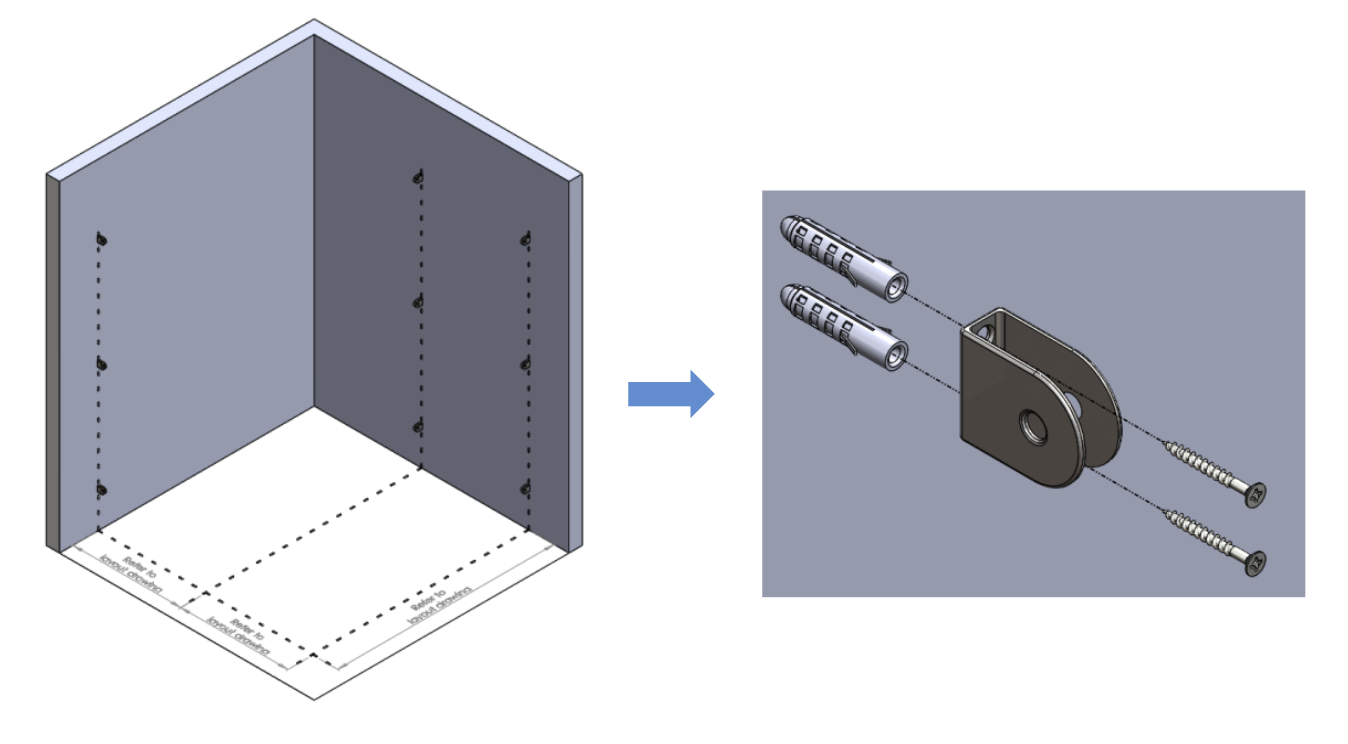
STEP THREE: Fitting the pilasters and partitions
Take your centre pilasters and fix them with U-brackets or U-channel to the end of the cubicle partitions - these are the side panels that make up the cubicle walls. Once a pilaster is affixed to a cubicle panel, you can then place the opposite end of the cubicle panel into your U-channel or U-bracket on the wall. Repeat for all cubicle panels. Now take your wall pilasters and fix them directly to the wall using the U-brackets of U-channel.
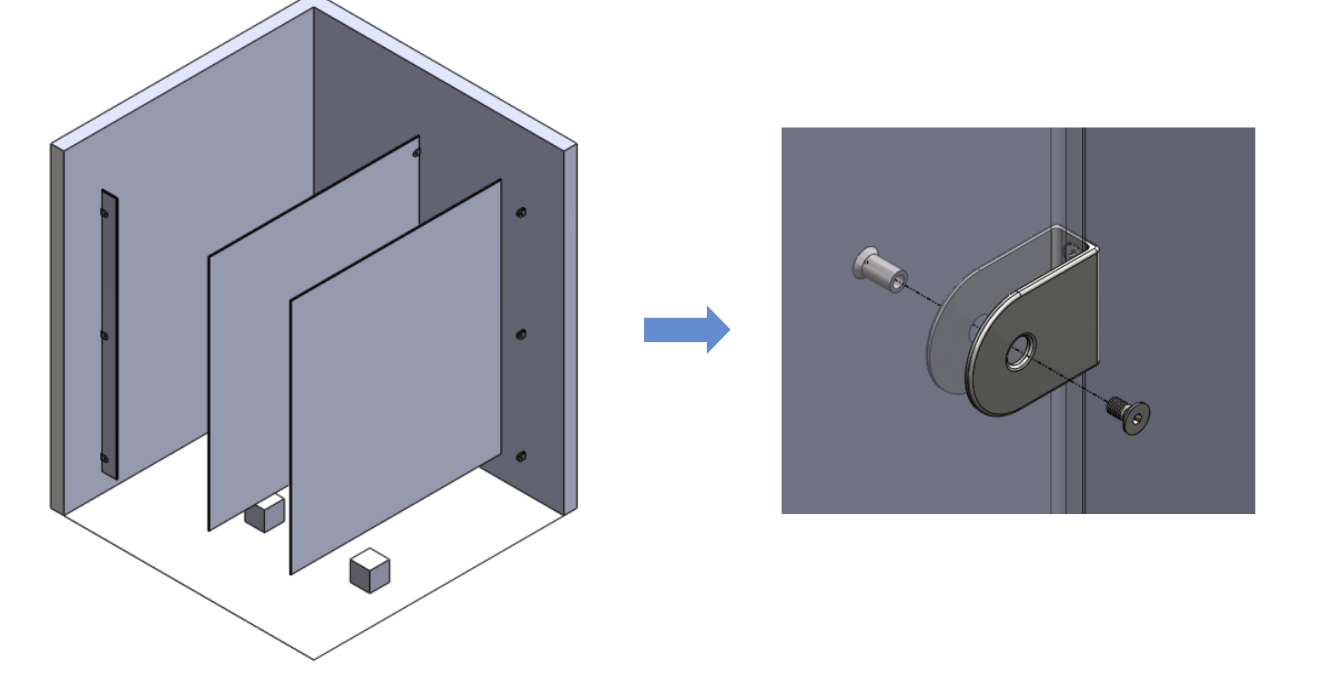
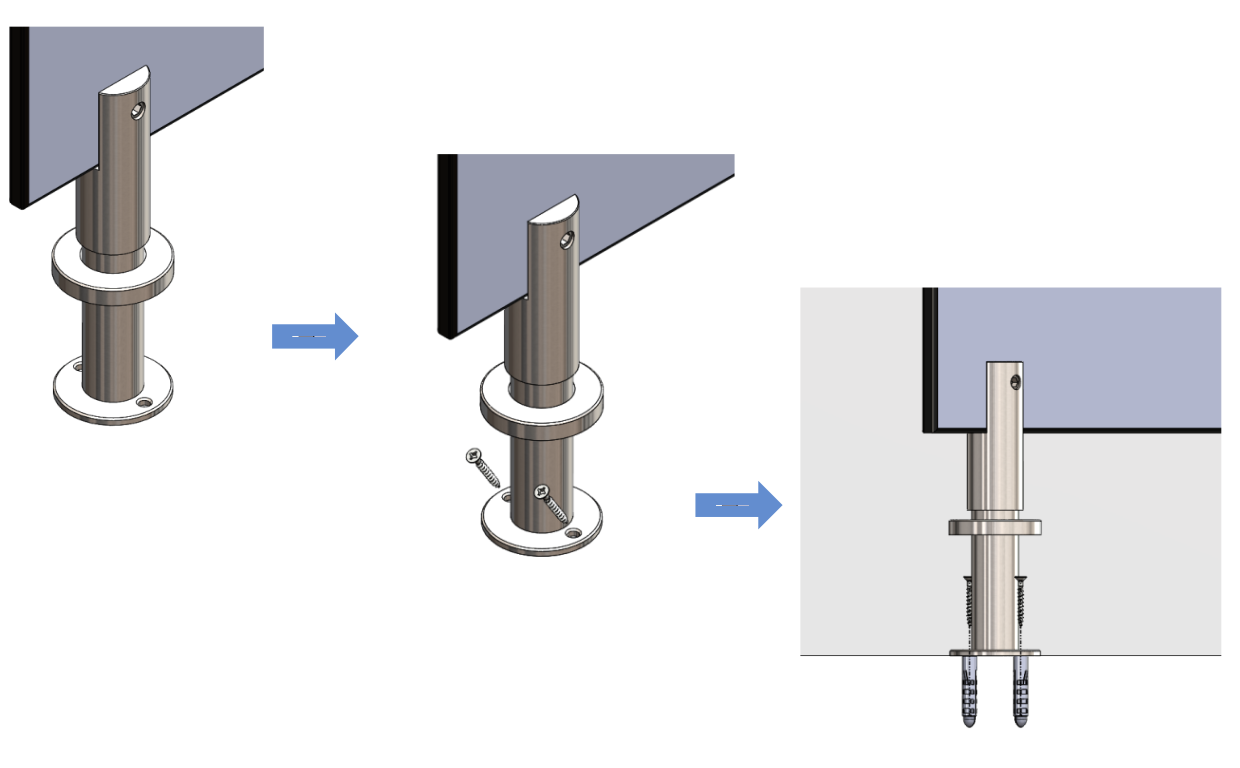
Using a block of wood or a temporary cubicle leg, prop up the cubicle partition and begin to install each of the toilet cubicle legs to the partitions.
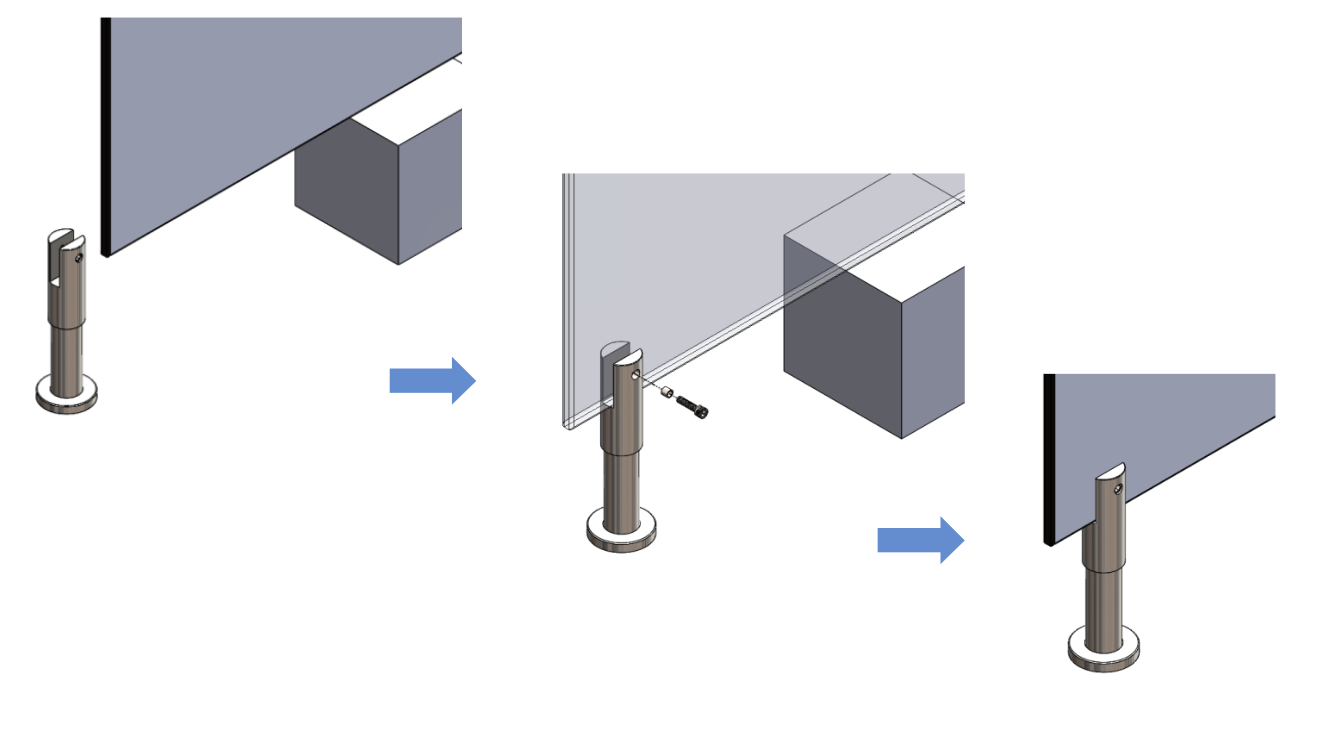
Adjust each of the toilet cubicle feet to ensure each of the partitions are at the same height. This is very important so that the cubicle head-rail is fitted flat to the top of the cubicle partitions.
STEP FOUR: Fitting the head-rail and doors
Fit the cubicle head-rail, making sure the front fittings are at the same centres as the rear wall (i.e. 900 centres) and check that the door gaps are correct as per your drawing.
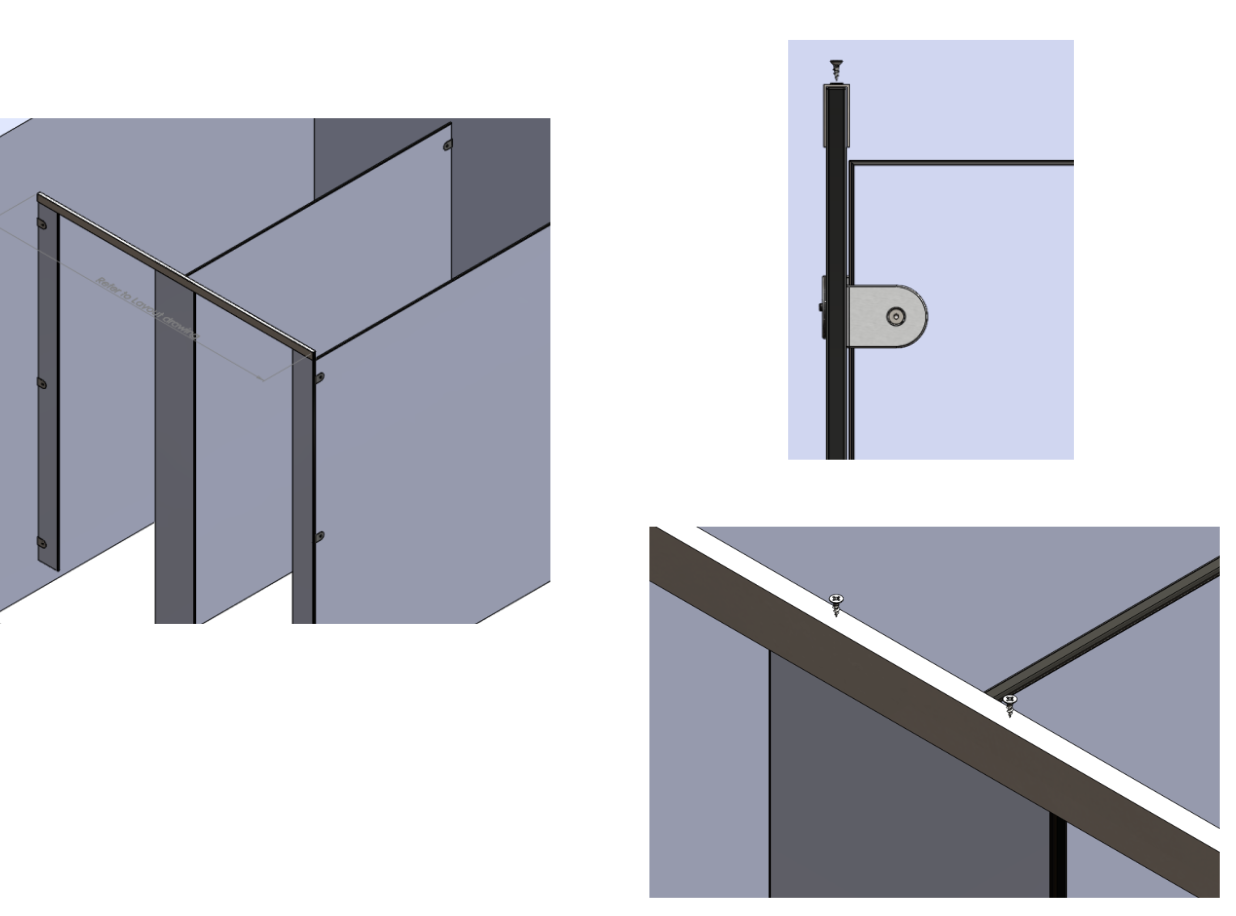
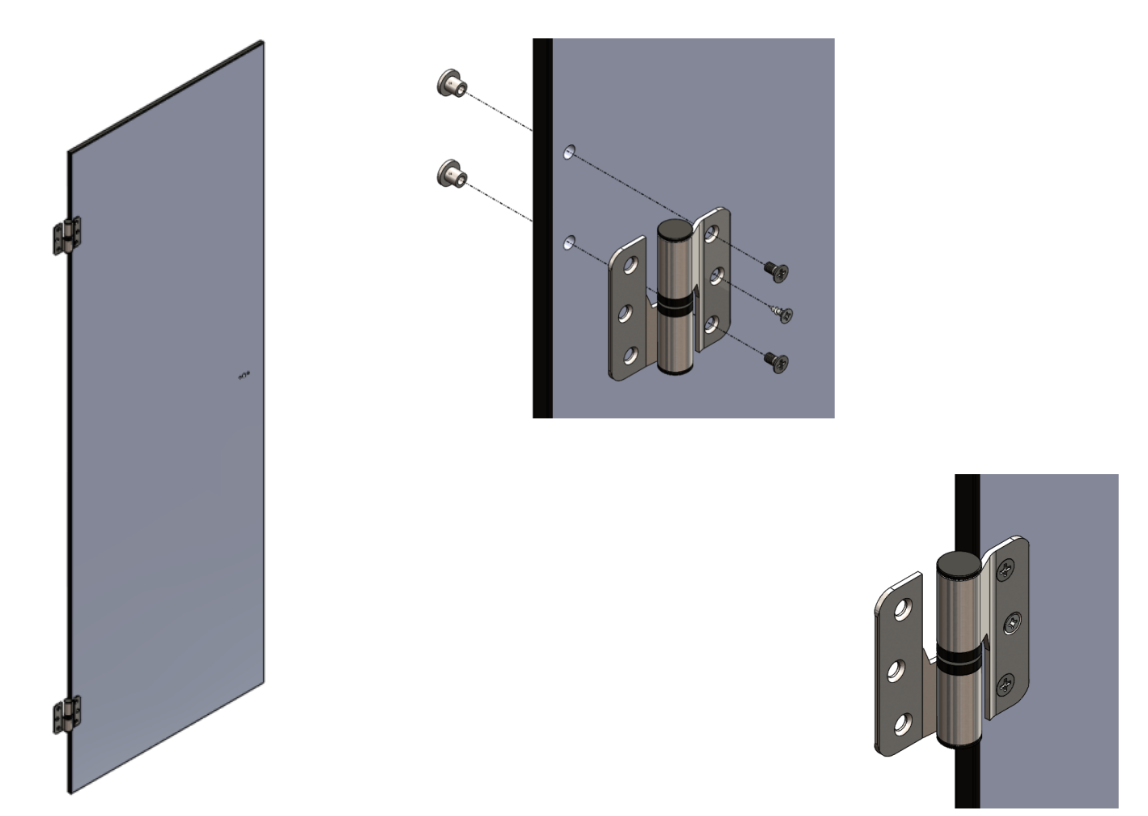
STEP FIVE: Fitting the hinges, doors, and lock
Next step is to fit the hinges and locks to each door and hang the doors on to the pilasters.
Once you have checked everything is square, level and "plum", you can fix the cubicle feet to the floor and hang your doors.
If you’d like more information on how to fit toilet cubicles, or to discuss our design and cubicle installation services, get in touch with one of the team on 01202 650900.
MORE TO EXPLORE IN Related Posts

Ultra Shower Cubicles (Solid Grade Laminate)
Ultra Plus SGL Toilet Cubicles With Stainless Steel Hardware (High Abuse Range)

Future HPL Toilet Cubicle Range
Ultra Fast Delivery SGL Cubicle Packs

